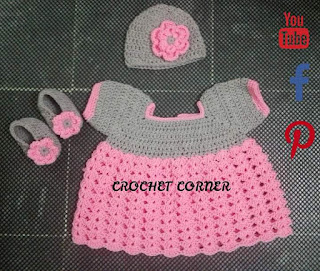
1 year old
Hook:3.5mm and 5mm.
BACK
PORTION OF TOP:
Chain: 48 with 3.5mm hook
Row 1: Dc in the 3rd Ch from the hook and dc till
end, turn. (46dc)
Row 2-3: Ch2, Dc over all the Dc, turn. (46 Dc)
Row 4: Ch2, Dc in the next stitch,* skip next stitch, Ch1,
Dc in the next stitch*, repeat * to * till end (ladder stitch), turn.
Row 5- 6: Ch2, repeat row 2, Turn.
Row 7: Ch2, repeat row 4, turn.
Row 8: Ch2, repeat row 2, turn
Row 9: Ch2 repeat row 4, turn.
Row 10: skip 5sts, ch2, make ladder stitch in next 36
stitches, and leave 5 stitches in the end, turn.
Row 11: Ch2, Dc over all the chains and dc’s of the ladder
stitch, turn. (36 Dc)
Row 12-14: Ch2, Dc over all Dc’s, turn.
Row 15: Ch 2, Dc in the next 17 stitches, Dc in next stitch
working in back loop, turn
Row 16-18: Ch2, dc over all DC’s, turn.
Snip the yarn at the end of row 18.
Row 19: Join the yarn on the next end at row 15 and crochet
inward, Ch2, Dc over all dc and take 1Dc in the front loop which already have a
DC in its back loop, turn.
Row 20-22: Ch2, Dc over all Dc, turn.
At this point your back portion will be 8” long and 12”
wide.
FRONT
PORTION OF TOP:
Chain: 48
Row 1: Dc in the 3rd Ch from the hook and dc till
end, turn. (46dc)
Row 2-3: Ch2, Dc over all the Dc, turn. (46 Dc)
Row 4: Ch2, Dc in the next stitch,* skip next stitch, Ch1,
Dc in the next stitch*, repeat * to * till end (ladder stitch), turn.
Row 5- 6: Ch2, repeat row 2, Turn.
Row 7: Ch2, repeat row 4, turn.
Row 8: Ch2, repeat row 2, turn
Row 10: Skip 5 stitches, Ch2, Dc in the next stitch,* skip 1Ch,
Ch1, Dc* in next stitch, repeat * to * 6 more times, turn.
Row 11: Ch2, Dc over all Chains and Dc, turn.
Row 12_18: Ch 2, Dc over all Dc, turn. Snip yarn at the end
of row 18.
Row 19: Come to the opposite side of row 10, join yarn ,
work inward, ch2, Dc in the next stitch,* skip 1Ch, Ch1, Dc* in next stitch,
repeat * to * 6 more times, turn.
Row 20: Ch2, Dc over all Chains and Dc, turn.
Row 21_27: Ch2, Dc over all Dc, turn.
Join the both the sides by stitching Row 1 to Row 9 on both
the sides.
Lower Frock:
With 5mm
hook
Row1: join yarn, SC in first stitch, ch5, *skip 3 stitches, SC
in next stitch, Ch 5*, repeat *to * till end, don’t turn, join with the first
sc. (total 29 5ch spaces)
Row 2: Ch2, take 10Dc in the first 5ch hole, “*Ch5, SC in
the next 5ch hole*, repeat * to * 3times more, 10 dc in the next hole”, repeat “to”
till end, slip stitch in the first 2ch, join.
Row 3: Ch2 Dc over DC, *CH5, SC in the next hole, repeat
till the 10dc hole, Dc over Dc*, repeat *_* till end, join.
Row 4:Ch2, Dc over the first DC, *CH1, Dc over the next DC*,
repeat *to * over all dc cluster, then Ch5, SC in the next hole, Ch 5, SC in
the next hole , repeat * to * over the next 10Dc cluster, repeat till end ,
join.
Row 5: move to the 5ch hole, Ch2, 10Dc cluster in the hole,
then *SC in the 1st Dc of the previous row , Ch5,skip 3 stitches, SC
in the next stitch, repeat till we have four 5Ch holes, Dc in the 5Ch hole of
previous row*, repeat *_* till end, join.
Row 6: repeat row 2, join
Row 7: repeat row 3, join.
Row 8: repeat row 4, join.
Row 9: repeat row 5, join.
Row10_12: repeat row 2-4, join.
Row 13: repeat row 5, join.
Row 14 _16: repeat row 2_4, join.
Row 17: repeat row 1.
Picot boarder
Row 1 : Ch5, skip 3 stitches, Ch5 , continue till end, join.
last row: step in the 5ch hole , *Dc2, Ch3, slip knot in the third ch to make a picot , then Dc2 in the same hole*, repeat *_* till end.
Neck Boarder
Row 1: dc 3 in one stitch, skip 2ch, dc3 in next ch, continue around the neck.
Row 2: Dc over all DC, make picot on the 2nd dc just like Picot boarder row 1.
Make the flower from HERE


I would like to make this for a 2 yr. Old using light (3) yarn. Any suggestions?
ReplyDeletesorry for late reply as i was not very active on my blog. I havent took measurements of this frock otherwise i would have guided you regarding increase in stitches
DeleteThe picture looks different than the directions picture.
ReplyDeletenever mind i was looking at the next pattern pic at the bottom.
ReplyDeleteno problem, if you are following this pattern please share your recreation witn me at samrariaz600@gmail.com. Regards
Delete